Writing Python Apps
Python offers an easy-to-read, flexible programming language, with the full power of AI and data analysis. This is why Python is a first-class citizen for Octostar. The platform supports two flavors of Python programming for apps:
- Streamlit, a full-stack solution which can be used to create highly customizable and interactive apps, especially for data analysis and visualization
- FastAPI/Flask, to create REST APIs that other apps or components in the Octostar platform can use, such as manifest transforms and endpoints for the automated data processing pipeline. These apps can make use of pure HTML+CSS+JS, ReactLive, or even another Streamlit server (via nginx) to also expose user interfaces
Quickstart Developer Guide
To develop your first app, from any workspace select Create ➝ App and choose either the Streamlit or Flask templates. Next, give a name to the app and, from the App Editor, select Deploy App.
DO NOT PANIC After deploying your app, attempting to open it will likely result in a 503 or 502 from nginx. This is normal behavior, as the app is deploying (unpacking, installing dependencies, etcetera) but not yet fully deployed. You can monitor the installation state of the app via the Logs Viewer.
From this point onwards, you can begin making changes to the template files, or even begin anew. In general, development can either be:
- Within the Octostar Platform, inserting files using the built-in editor and using the Deploy App function. This method is useful for quick development of small-scale applications or for production-ready testing. All functionalities provided by Octostar will work out-of-the-box, without the hassle of working outside of the platform's context. However, it is slow to iterate upon, as each change requires to save the new files and redeploy the app in its entirety
- Developing locally. This allows the developer to use the tools and IDE they are most familiar with, with a much faster code-test-debug cycle. However, it does require some tweaks, which are explained in the next section.
MAKING CHANGES AND DEPLOYMENT
Remember that, whenever changes are applied to any files in the app, as well as changes in the Secrets Manager, the app MUST be redeployed for the changes to take into effect.
This rule does not apply to changes in the manifest (except those related to deployment) and to applications served directly from the front-end, that is, those using an engine!=k8s.
Developing Locally in your own IDE
When developing a complex app, debugging it with your familiar development environment can be very valuable. The steps to develop locally are as follows:
Create a Virtual Environment [Optional, Recommended]
A virtual environment is always recommended when working with Python projects. This can be per-app or globally for multiple apps. You can use your favorite tools to create a venv, such as virtualenv, conda... For example, using conda:
conda create -n octostar_env python=3.11
conda activate
Install the Required Libraries
pip install octostar-streamlit
pip install streamlit-octostar-utils
pip install "${OCTOSTAR_URL}/api/octostar/meta/octostar-python-client.tar.gz"
As the packages are still in development, it is a good idea to uninstall and purge cache before re-installing them, for any reason:
pip uninstall octostar-python-client
pip uninstall octostar-streamlit
pip uninstall streamlit-octostar-utils
pip cache purge
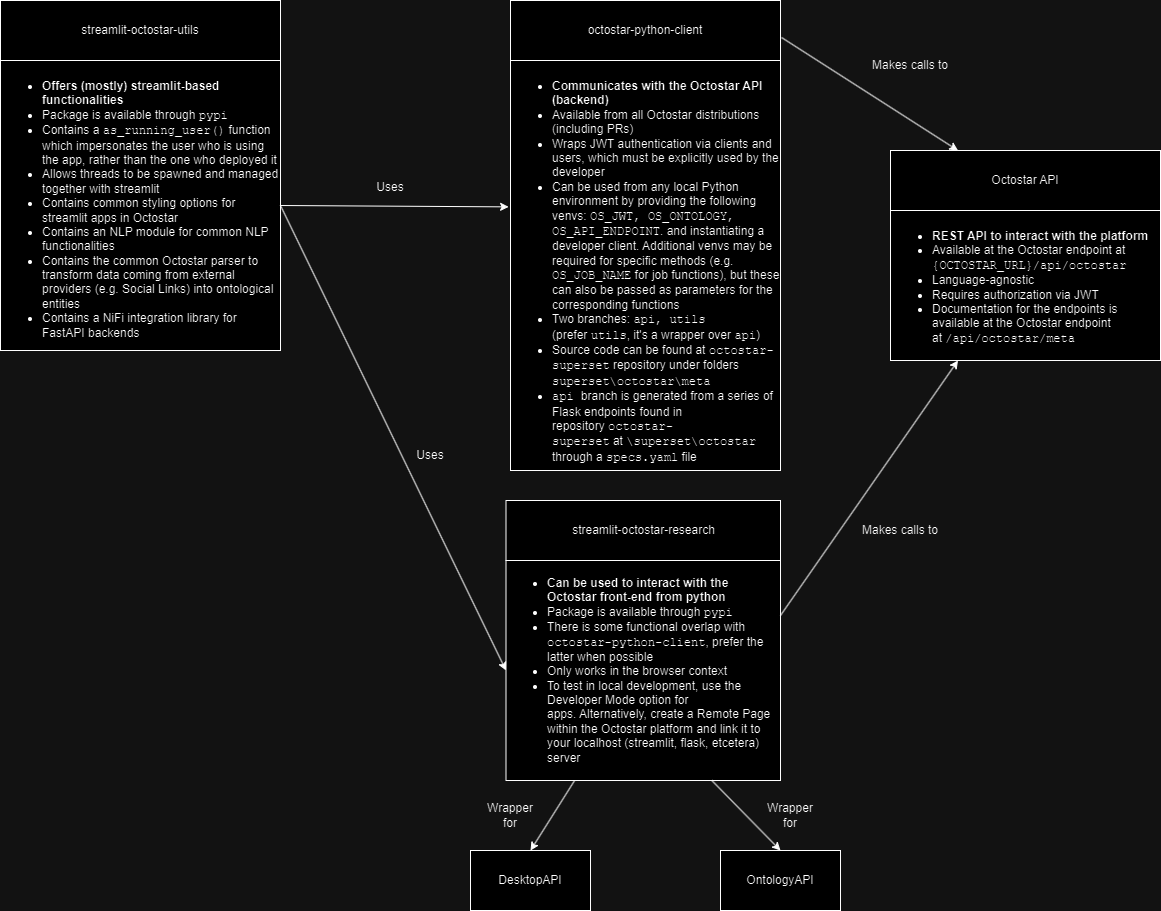
A general idea of what these libraries do and how they are interconnected can be explained by this diagram:
Running the App
Develop code as normal in your IDE. To test the app you can either:
- Run and debug it locally, if there are no interactions with Octostar
- Run it via a Remote Page, if there are browser interactions
- Run with a developer client, if there are back-end interactions More on these points in the following sections.
Back-End Calls
Operations like querying for data, read/writes on files, the jobs system and notification systems, app secrets and many more pass through the back-end. In general, all operations that do not require an active browser session can be done as a back-end call. For the full list of supported operations, you can look at:
- The Octostar API at
{OS_API_ENDPOINT}/api/octostar/meta - The docstrings in
octostar-python-client, particularly under the modules underoctostar.utils. For instance, reading files is supported with functionoctostar.utils.workspace.read_file(), while reading an app's secrets is done viaoctostar.utils.jobs.apps.get_app_secret(). To be able to execute back-end calls against Octostar (in particular via theoctostar_python_clientlibrary), run your app from your IDE as usual but define at least these environmental variables:
| Environment Variable | Description |
|---|---|
| OS_JWT | Your personal JWT token as seen in the "whoami" endpoint at {OS_API_ENDPOINT}/api/octostar/meta/whoami. This token is used for authentication when calling any Octostar API. |
| OS_API_ENDPOINT | The public URL of your Octostar installation. |
| OS_ONTOLOGY | The name of the ontology as configured in Octostar UI. |
| OS_DEV_MODE | Set it to the string "true" to enable developer mode. Under developer mode, the behavior of some functions changes (such as the dev_mode decorator and get_app_secrets). |
Some back-end functions may also require additional environment variables, such as OS_JOB_NAME, but these can typically be passed as parameters to the corresponding functions.
Next, instantiate a developer client and call the back-end functions as follows:
from octostar.client import as_developer_user
from octostar.utils.ontology import query_ontology
with as_developer_user() as client:
  client.execute(query_ontology.sync, "SELECT * FROM dtimbr.person")
You can also explicitly pass the environment variables as parameters to as_developer_user(), if you prefer. In fact, there are several ways to define clients (and the users they impersonate), both for development and production. In particular, you may decorate a function like this:
from octostar.client import impersonating_launching_user, dev_mode
@impersonating_launching_user()
@dev_mode(os.getenv('OS_DEV_MODE'))
def my_function(client):
    ...
This will dynamically swap the client in use (development or production) based on the OS_DEV_MODE flag, rather than having to manually change the client at multiple points in code.
The development client always uses the environment variables defined above, including the authorization JWT (which will eventually expire), while production clients will refresh the authorization based on the user role.
When this flag is enabled, the behavior of octostar.utils.jobs.apps.get_app_secret also changes: it will look for a .env file in your app and, if it contains the key for the secret, it will use the value contained in that file. This is useful to separate sensitive credentials during local development from the rest of the app, assuming the .env file is set to be ignored by git.
You can check the full details about clients and users here: Authentication & Impersonation (Authentication & Impersonation)
Browser Interactions
To be able to also execute browser-related functionality (e.g. from streamlit_octostar_research), enable Developer Mode in the Octostar platform from the app of your choice (you can create an Empty App if you don't have one), and pass it the local URL of your running app server. This will allow to test the full functionality of the app, including context and browser interactions. Note that back-end interactions using Developer Mode still need to happen via a developer client.
Alternatively, you can create a Remote Page in your Octostar deployment and connect it to a locally running server (e.g. streamlit). Ensure that under the Remote Page Editor your page has permissions to execute the functions you are running. With Remote Pages, browser functionality will work, but you will not be able to test manifest-related functionality.
A Complete (and Minimal) Startup Script Example
import os
from dotenv import load_dotenv
from octostar.client import impersonating_launching_user, dev_mode
from octostar.utils.ontology import query_ontology

def runcommand(cmd):
    try:
        os.system(cmd)
    except Exception as e:
        print(e)

def inject_env():
    os.environ['OS_DEV_MODE'] = 'true'
    # Load environmental variables from a .env file. This is the recommended approach
    load_dotenv()
    # Alternatively, specify them manually
    os.environ["OS_API_ENDPOINT"] = 'your-endpoint'
    os.environ["OS_JWT"] = \
        "your-jwt"
    os.environ["OS_USER"] = "your_username"
    os.environ["OS_ONTOLOGY"] = "os_ontology_v1"
    print("Env injected.")

inject_env()

@impersonating_launching_user()
@dev_mode(os.getenv('OS_DEV_MODE'))
def start_app(client):
    ### YOUR CODE HERE
    client.execute(query_ontology.sync, "SELECT count() FROM dtimbr.person")
    ### OR RUN SOME ALREADY DEFINED APP (streamlit, flask, etc.). You can even run main.sh from here
    runcommand("python main.py")

if __name__ == '__main__':
    while True:
        answer = input("Reinstall libs? ")
        match answer:
            case "y":
                runcommand("pip uninstall -y octostar-python-client")
                runcommand("pip uninstall -y streamlit-octostar-research")
                runcommand("pip uninstall -y streamlit-octostar-utils")
                runcommand("pip cache purge")
                download_endpoint = os.environ["OS_API_ENDPOINT"]
                runcommand(f"pip install {download_endpoint}/api/octostar/meta/octostar-python-client.tar.gz")
                runcommand("pip install streamlit-octostar-research")
                runcommand("pip install streamlit-octostar-utils")
                break
            case _:
                break
    start_app()