Data Mapper
Timbr’s Data Mapper page enables users to manage, create, edit, and remove data mappings from the data model to the underlying data sources. The data mappings can include calculated fields and any other function the underlying database supports (JOIN, UNION, CAST, CONCAT, etc.). The Data Mapper has complete version control and a simple-to-use cache functionality to optimize query performance. The data mappings can be performed using either the no-code UI or standard SQL for more complex scenarios.
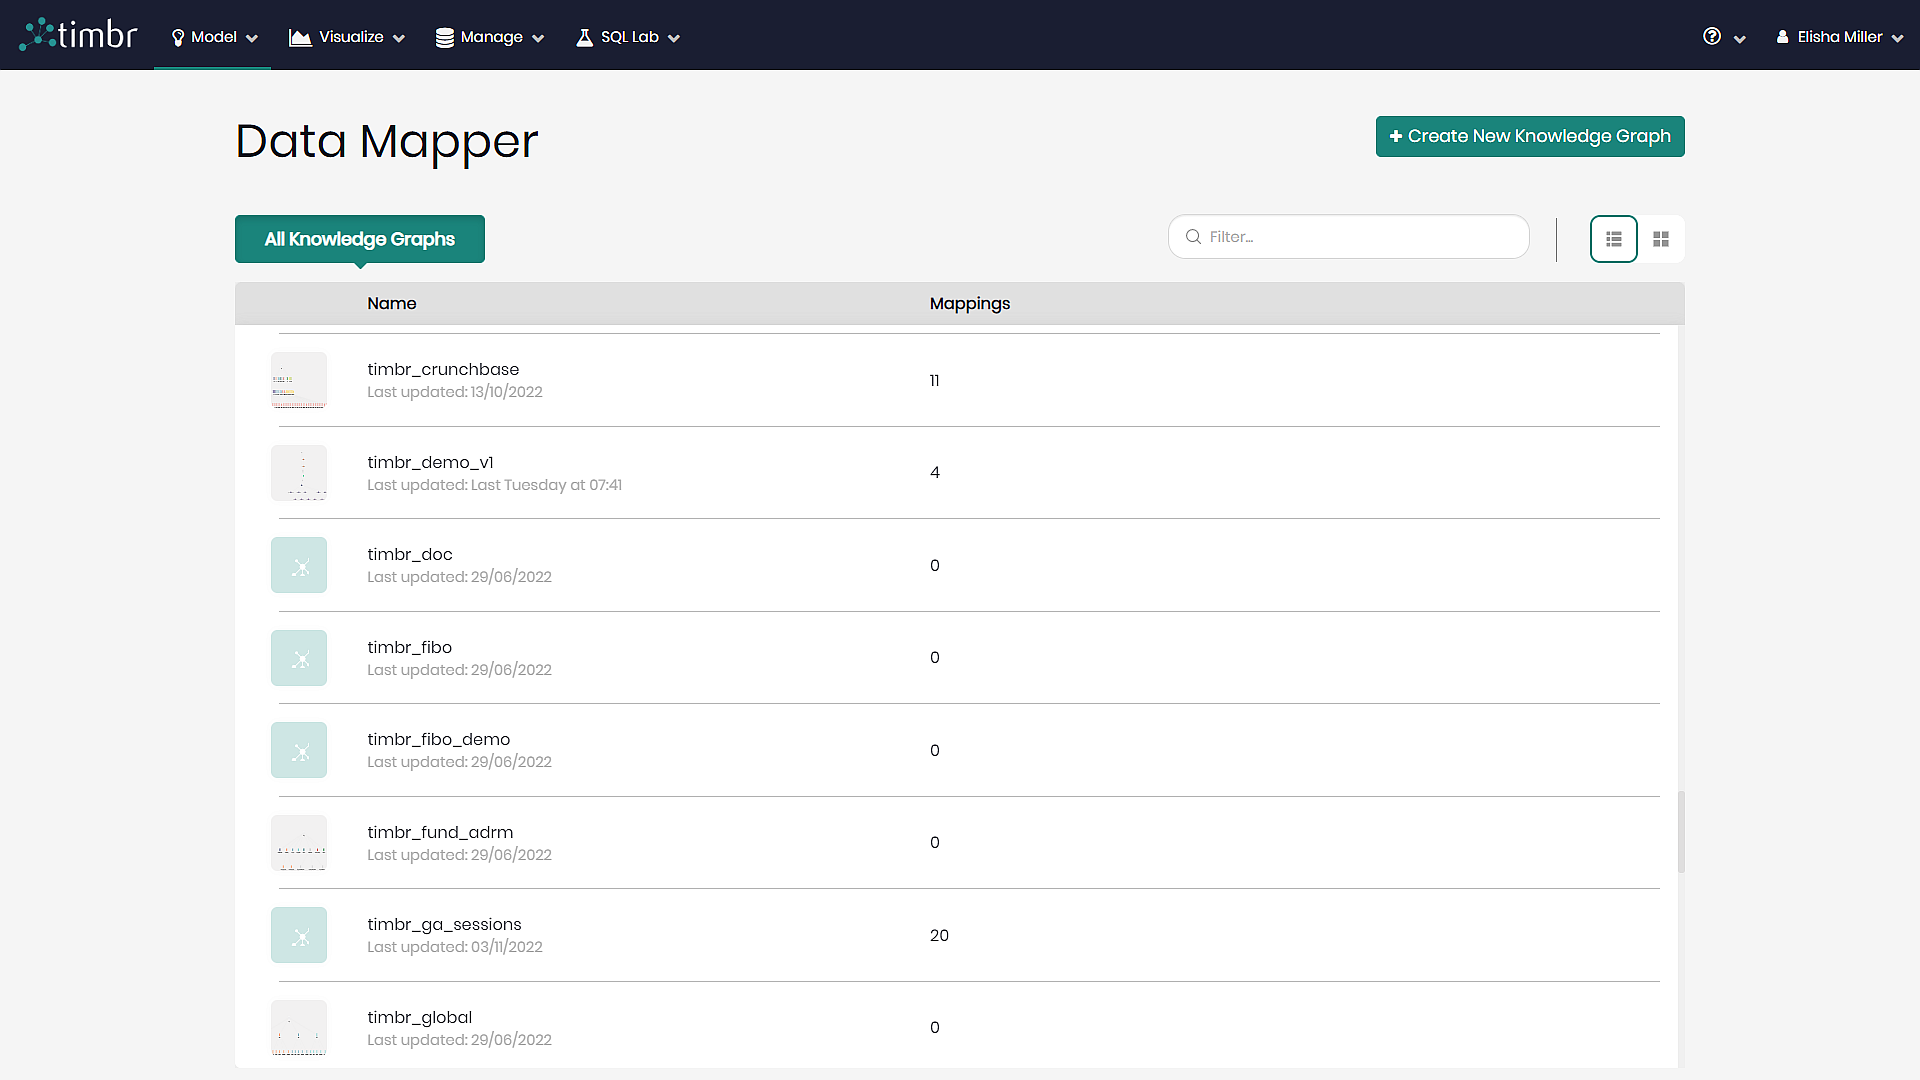
Timbr's Data Mapper component can be accessed through the Model tab by clicking on Data Mapper and selecting the desired knowledge graph.
Getting Started
There are two ways to begin mapping data in Timbr’s Data Mapper. The two ways are:
Create New Knowledge Graph - This button can be found on the top right side when entering the data mapper, enabling users to create a new knowledge graph on the spot and map data to it.
Choose a Knowledge Graph - Users can select any knowledge graph from the existing knowledge graphs on the list and begin mapping data to the selected knowledge graph.
Once the knowledge graph is chosen, all existing mappings which include concept mappings, many-to-many mappings and multi-value mappings will appear.
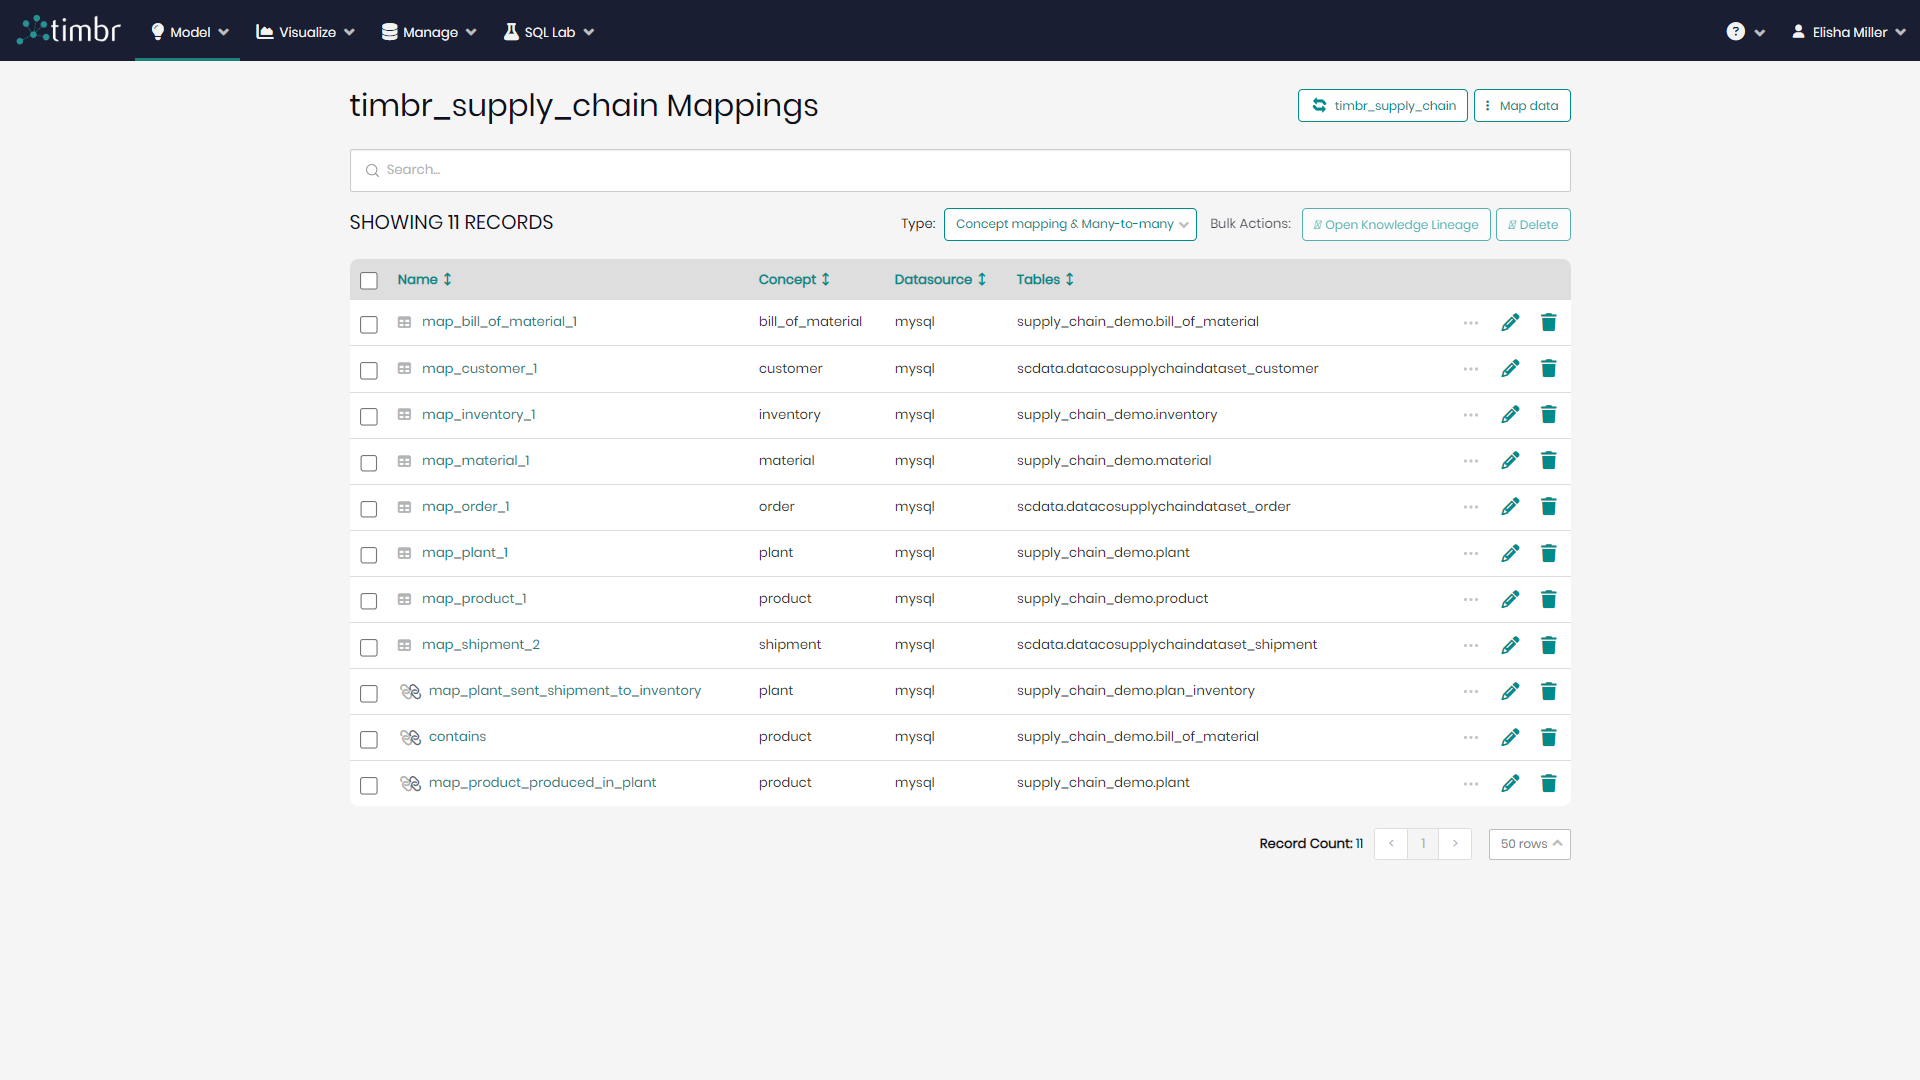
On the top right next to the mapping name there are two options:
Change Current Knowledge Graph - When clicked on, a pop-up window will appear enabling users to choose any other existing knowledge graph from the list.
Map Data - Opens a pop-up window offering users to create a mapping of one of three types (concept mapping, many-to-many mapping, multi-value mapping).
Below the previous two options is the search bar enabling users to search for specific mappings from the list.
Beneath the search bar is the number of current mappings. To the right there are the following options:
Type - Allows users to filter the list of mappings by the different types of mappings.
Bulk Actions - Any mappings selected from the list can have bulk actions performed on them, which include:
- Open knowledge Linage - Opens a knowledge lineage graph so users can visualize the selected mappings and their full lineage on the graph.
- Delete - Enables users to delete any mappings they’d like.
Each Mapping on the list contains a name, a concept it belongs to from the knowledge graph, a data source it’s connected to, and the table the mapping is using.
To the right of that information, each individual mapping has its own functionalities which include:
Cache Resource - Enables users to cache the data behind the selected mapping.
Copy Query - Enables users to see and copy the SQL syntax to the clipboard that created the mapping.
Open Knowledge Lineage - Opens a pop-up with a knowledge lineage graph containing the selected mapping.
History - Presents users with a history log containing all the changes and actions performed on the mapping.
Edit Mapping - Allows users to make changes to the existing mapping.
Drop Mapping - Drops and deletes the selected mapping from the knowledge graph.
Mapping Data to a Concept Visually
Step 1 - Click on Map Data on the top right side of the Data Mapper screen.
Step 2 - Click on Create Concept Mapping.
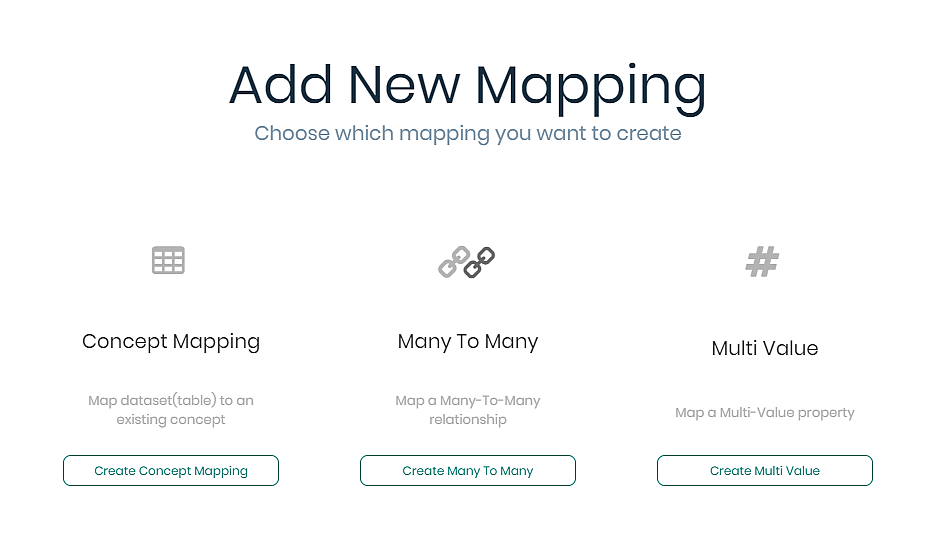
Once clicked a concept mapping window will appear in order to visually map data to a knowledge graph concept.
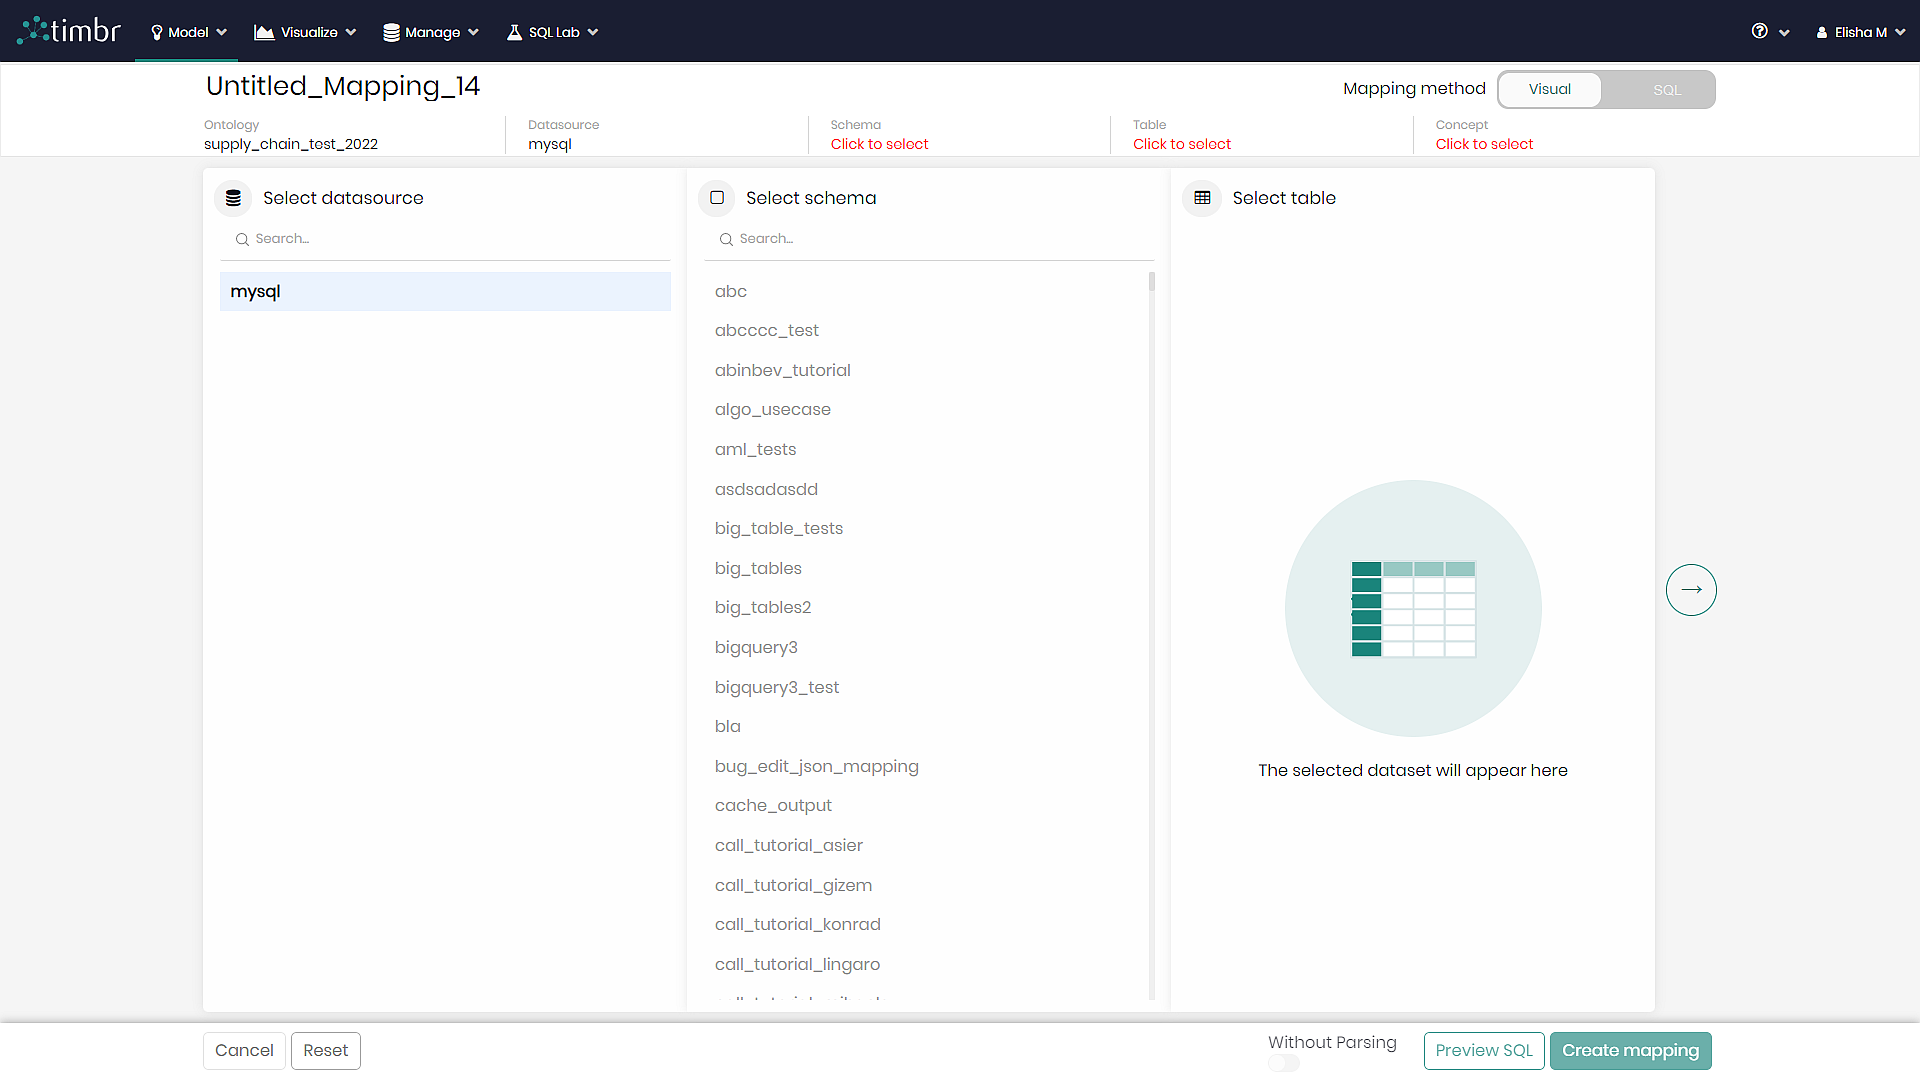
On the top right, users can switch the mapping method toggle from Visual to SQL in order to perform a concept mapping using SQL DDL statements.
Step 3 - On the top left, give your mapping a name.
Step 4 - Beneath the mapping name, the ontology name will appear. Alongside that, choose the relevant Datasource, Schema, Table, and Concept to which you wish to map data.
Step 5 - Match the column names from the datasource to the concept properties. The matching can be done manually or instead can be done automatically by Timbr by clicking on Add all suggestions on the top right of the screen. If matching is done automatically, it’s worth checking to see if all the matches have been matched as intended.
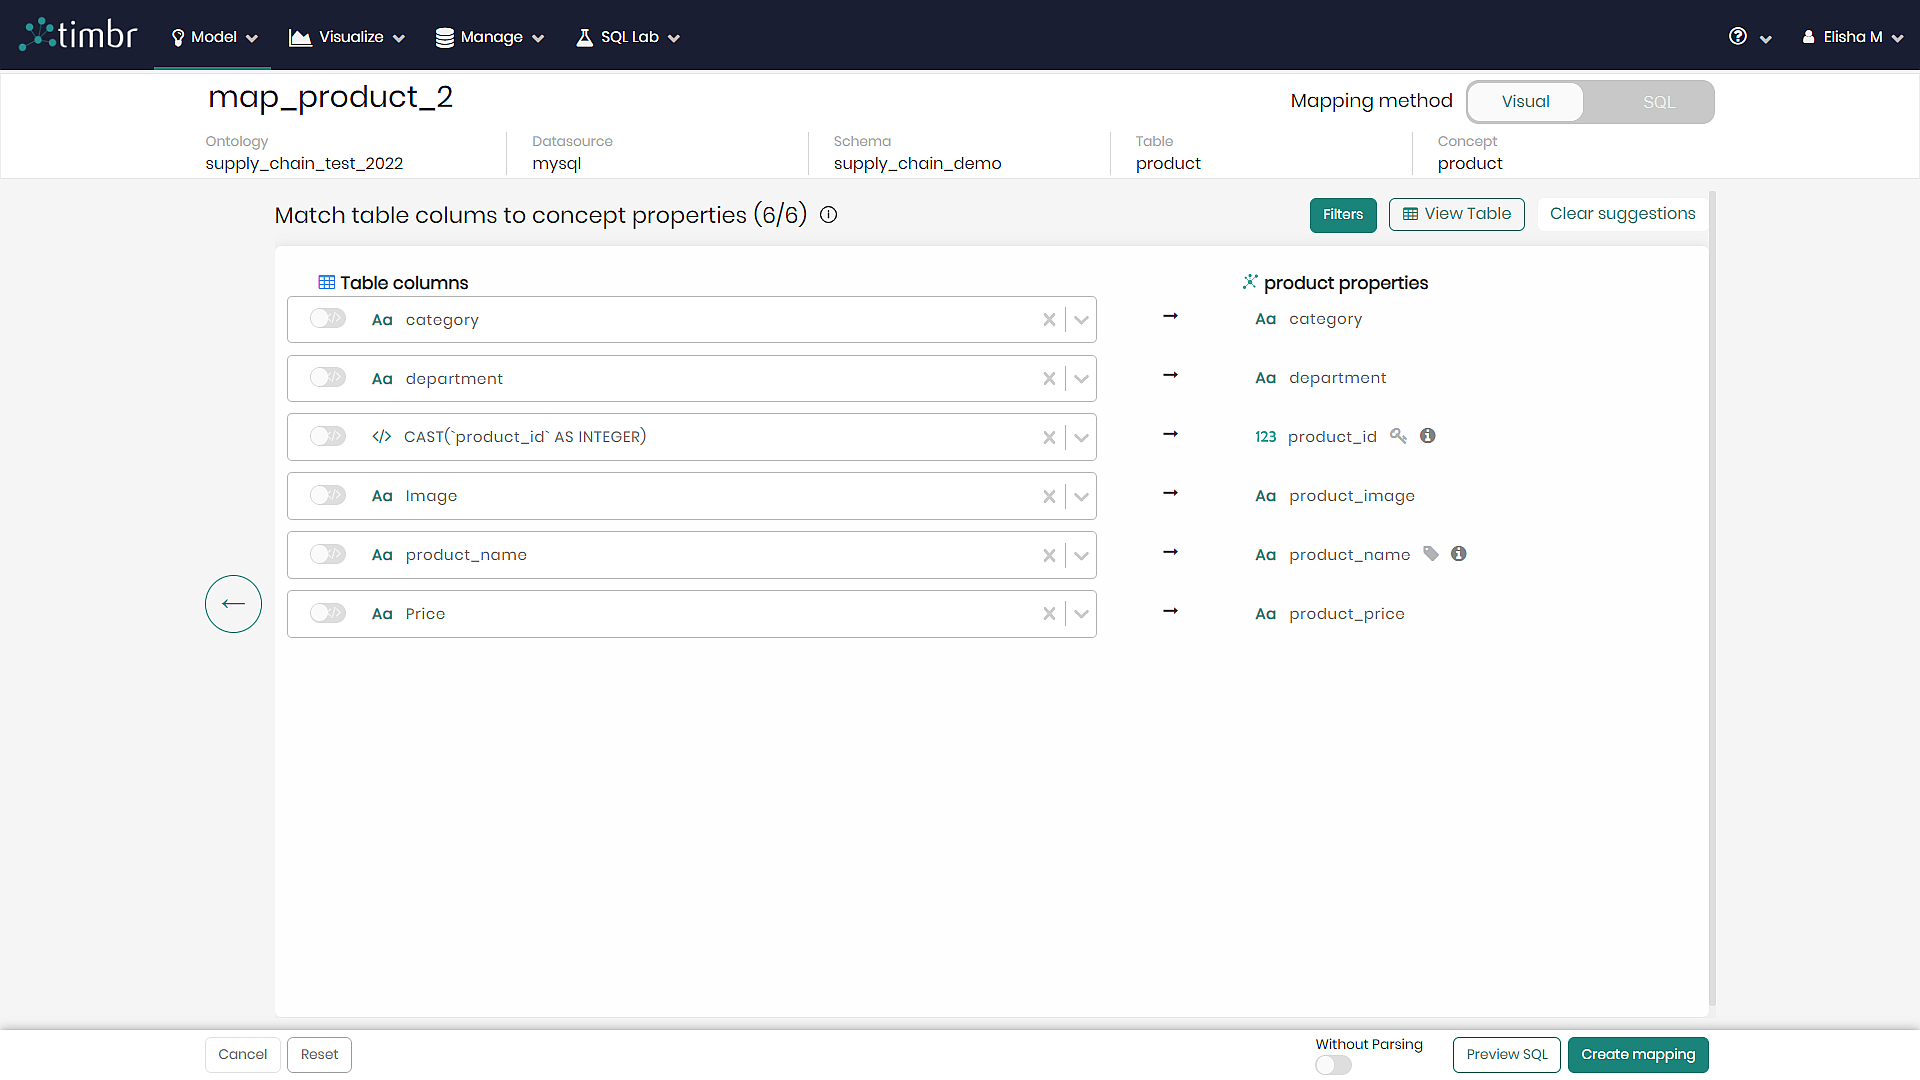
At this point, users can perform any SQL functions on the table columns (CAST, SUM, etc.), as well as add desired filters.
When done matching, at the bottom of the screen users can choose the following actions:
Cancel - Cancels the mapping and returns to the main page of the Data Mapper.
Reset - Resets the mapping process and returns to rechoosing datasource, schema, table, and concept.
Parsing - A toggle for deciding whether to parse or not to parse the SQL in Timbr during the mapping.
Preview SQL - Opens a slider with an SQL preview of the current mapping.
Create mapping - Creates and saves the mapping in the knowledge graph.
Mapping Data to a Concept with SQL
Step 1 - Click on Map Data on the top right side of the Data Mapper screen.
Step 2 - Click on Create Concept Mapping.
Once clicked a concept mapping window will appear in order to visually map data to a knowledge graph concept.
Step 3 - On the top right, change the Mapping method toggle from Visual to SQL.
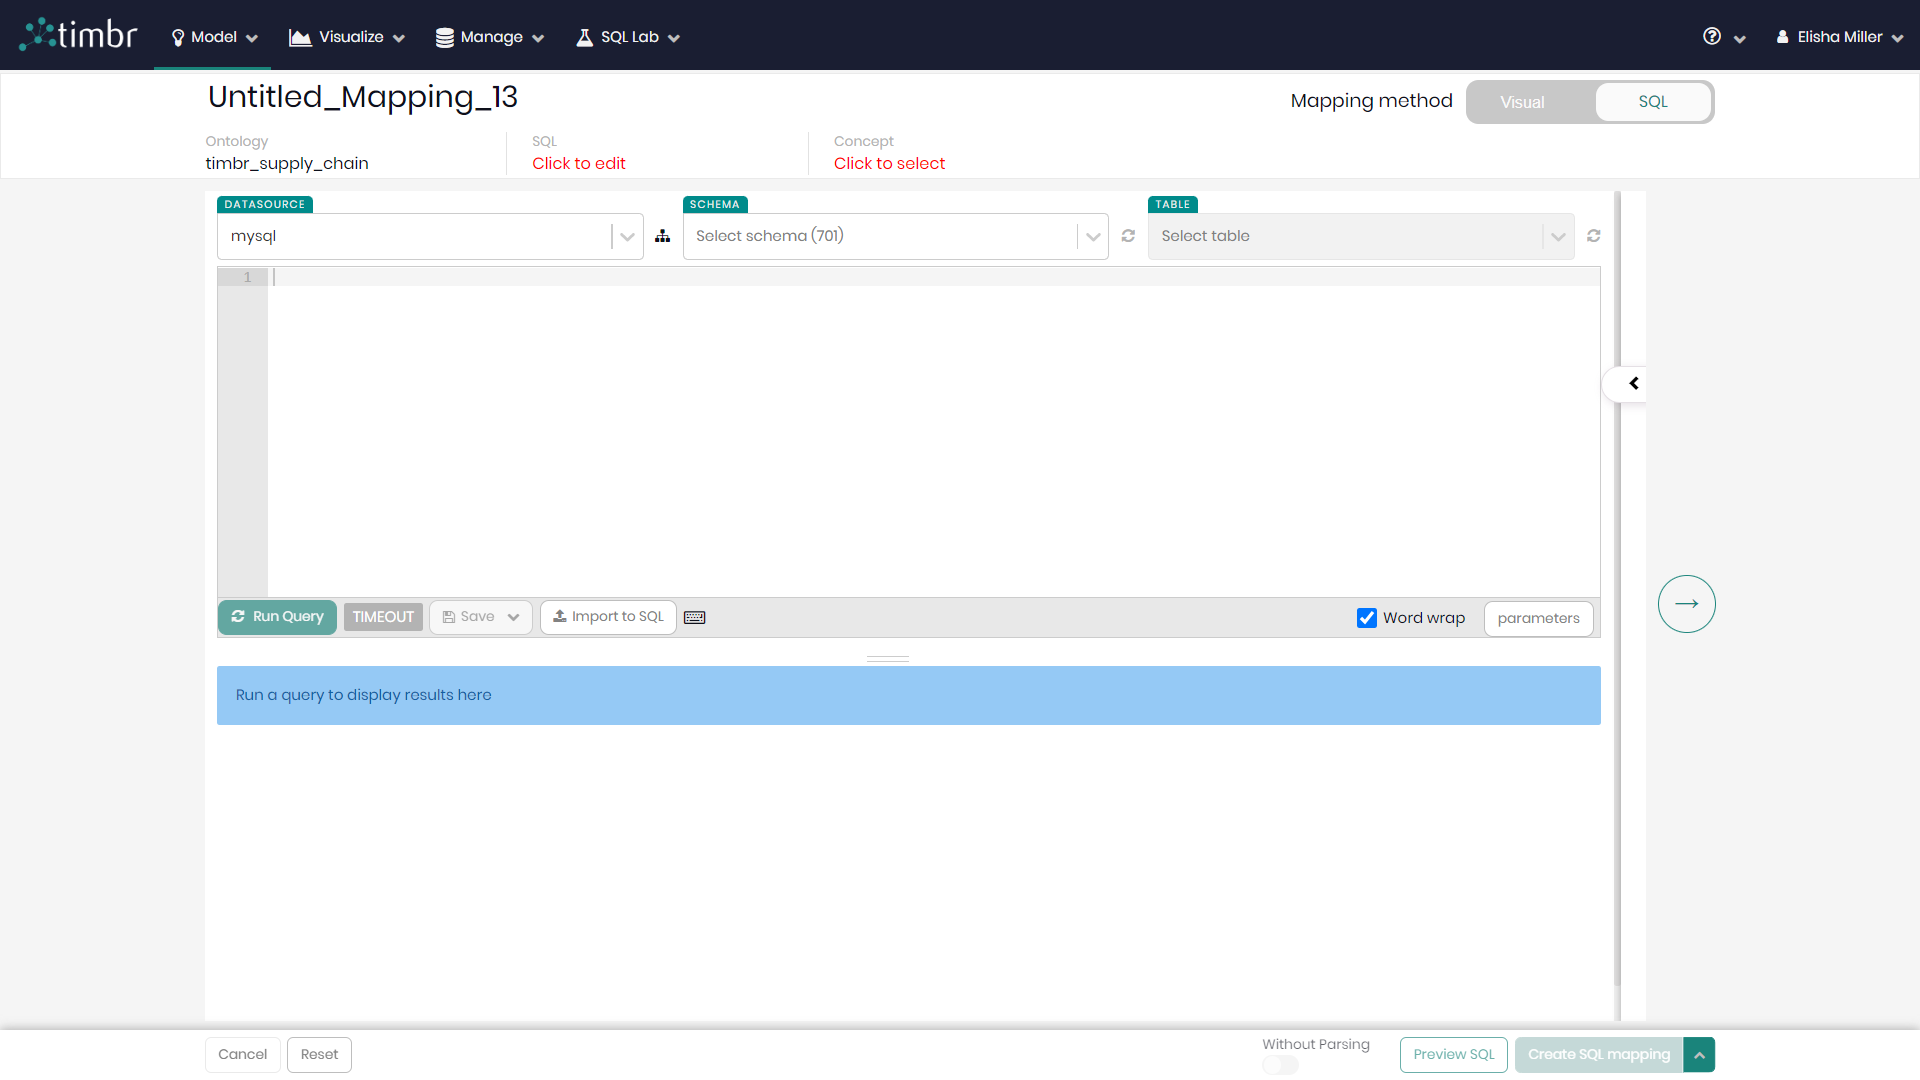
Step 4 - On the top left, give your mapping a name.
Step 5 - Beneath the mapping name, the ontology name will appear. Alongside that, click on SQL to begin editing the SQL mapping statements.
Step 6 - Next to edit SQL, once the mapping statements are in the main query box, choose the concept you wish to map the data to.
At this point, users can click on Create SQL mapping on the bottom right to create and save the mapping in the knowledge graph.
Users can also choose to query the different tables of their datasource as well as existing knowledge graph concepts to assist in creating the new mapping. This is done by simply writing the desired query in the main query box and running the query to see the results.
In addition, users can be assisted by selecting the datasource, schema, and table, which will slide in a panel with the metadata of the chosen datasource.
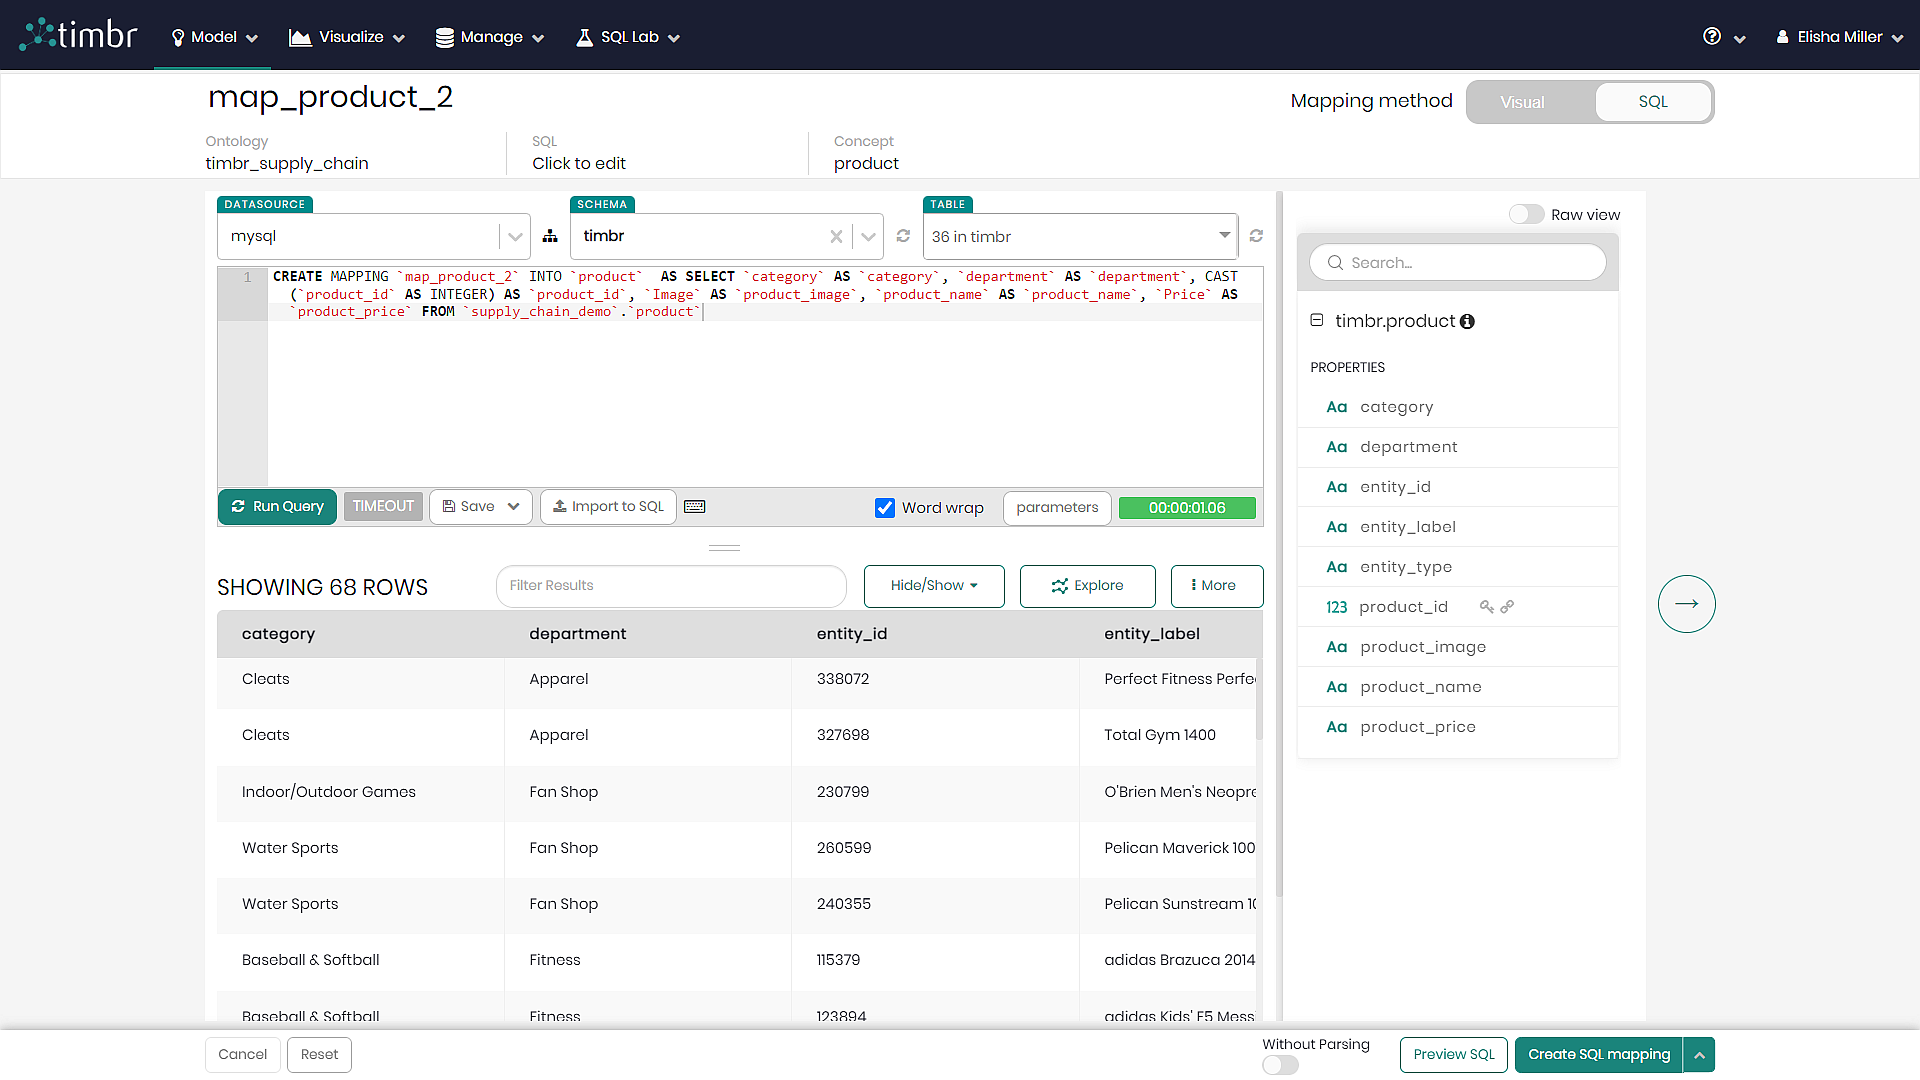
Beneath the query box there is a toolbar that includes the following functions:
Run Query - Runs the query in the main query box.
Timeout - Determining the query timeout in seconds. When left empty default timeout will be in effect.
Save - When clicked on, a dropdown opens with the 2 following options:
- Save query - Saves the current query which can later be found in the SQL lab tab under Saved Queries.
- Create view - Enables to create a view above the knowledge graph using the query results.
Import to SQL - This enables uploading a CSV file and having Timbr convert the CSV file into an SQL query that can then be mapped to the knowledge graph.
New table name - This enables typing a new table name and saving the query results to the new table being created.
Keyboard shortcuts and snippets - Presents various shortcuts and snippets in the SQL editor helping users write and run queries faster.
Word wrap - When the word wrap checkbox is marked, word wrap will be activated and any text that exceeds the length of any specific row will be pushed down to the next row. When the word wrap checkbox is unmarked text on any row can continue until specified otherwise.
Parameters - This enables creating and editing templates using the Jinja templating language which allows for using macros in the SQL code.
Query timer - Shows the query run time once run query is clicked.
When actions are done regarding the query, at the bottom of the screen users can choose the following actions:
Cancel - Cancels the mapping and returns to the main page of the data mapper.
Reset - Resets the mapping process and returns to rechoosing the mapping method.
Parsing - A toggle for deciding whether to parse or not to parse the SQL in Timbr during the mapping.
Preview SQL - Opens a slider with an SQL preview of the current mapping.
Create mapping - Creates and saves the mapping in the knowledge graph.