LAN mode (self signed CA)
Setting up Octostar in LAN mode with a self-signed Certificate Authority for secure, private deployment.
Why Use Self-signed SSL on Internal Networks?
When deploying Octostar on an internal network (private IP addresses like 192.168.x.x, 10.x.x.x, or 172.16-31.x.x), you can't use traditional SSL certificate providers like Let's Encrypt or ZeroSSL because:
- Domain Validation: These services require public DNS records and can't validate private IP addresses or internal domains
- Internet Accessibility: Certificate validation requires your server to be accessible from the internet (Octostar uses HTTP challenge for public certificates, which needs port 80 accessible)
- Security: Internal deployments often shouldn't be exposed to the internet at all
For these scenarios, self-signed certificates provide the encryption benefits of HTTPS without requiring external validation.
Prerequisites
Kubernetes Cluster Required
You must have a working Kubernetes cluster before proceeding with this guide. We recommend using RKE2 for optimal compatibility with Octostar.
We have created Ansible automation to facilitate RKE2 installation:Octostar RKE2 Installer
Additionally, ensure you have:
- Access to your internal network
- A server for your Octostar deployment with a static internal IP address
opensslinstalled on your workstation (usually pre-installed on Linux/macOS)- Administrative access to install certificates on client machines
Step 1: Choose Your Internal Domain
You need to create an internal domain for your Octostar deployment, such as octostar.local or octostar.internal. This provides:
- Easier to remember than IP addresses
- Flexibility to change IPs without regenerating certificates
- Better user experience
- Required for SSL certificate generation
Step 2: Generate Certificate Authority
We provide a convenient script to generate a self-signed Certificate Authority. Download and run it:
# Download the CA generation script
curl -O https://install.octostar.com/cagen.sh
chmod +x cagen.sh

# Generate CA for your domain
./cagen.sh octostar.local
The CA generation script will:
- Generate a Root Certificate Authority (CA)
- Output Base64-encoded CA files for Octostar configuration
Example Output
When you run the script, you'll see output like this:
$ ./cagen.sh octostar.local

========================================
  Welcome to self-signed CA generator
  Domain: octostar.local
========================================

--> Generating Root CA...

--> Encoding CA files to Base64...

----------- CA FILES -----------

CA_CERT=LS0tLS1CRU....URS0tLS0tCg==

CA_KEY=LS0tLS1CRUdJTi....UgS0VZLS0tLS0K

Generated files:
- ca.crt (copy in https://install.octostar.com and install in browser trusted root store)
- ca.key (copy into https://install.octostar.com)
Generated Files
After running the script, you'll find these files in your directory:
- ca.crt - Root Certificate Authority certificate (copy to https://install.octostar.com and install in browsers)
- ca.key - Root CA private key (copy to https://install.octostar.com - keep this secure!)
Important: This script creates a self-signed Certificate Authority that Octostar will use to generate all required certificates automatically. The CA certificate should be installed on all client machines for trust, and the CA private key must be kept secure as it can create new trusted certificates.
Step 3: Configure Octostar Installation
Use the installation form at https://install.octostar.com to generate your installation command as usual, but pay attention to the networking configuration. You should now select "use internal domain" and paste the CA files into the TLS fields.
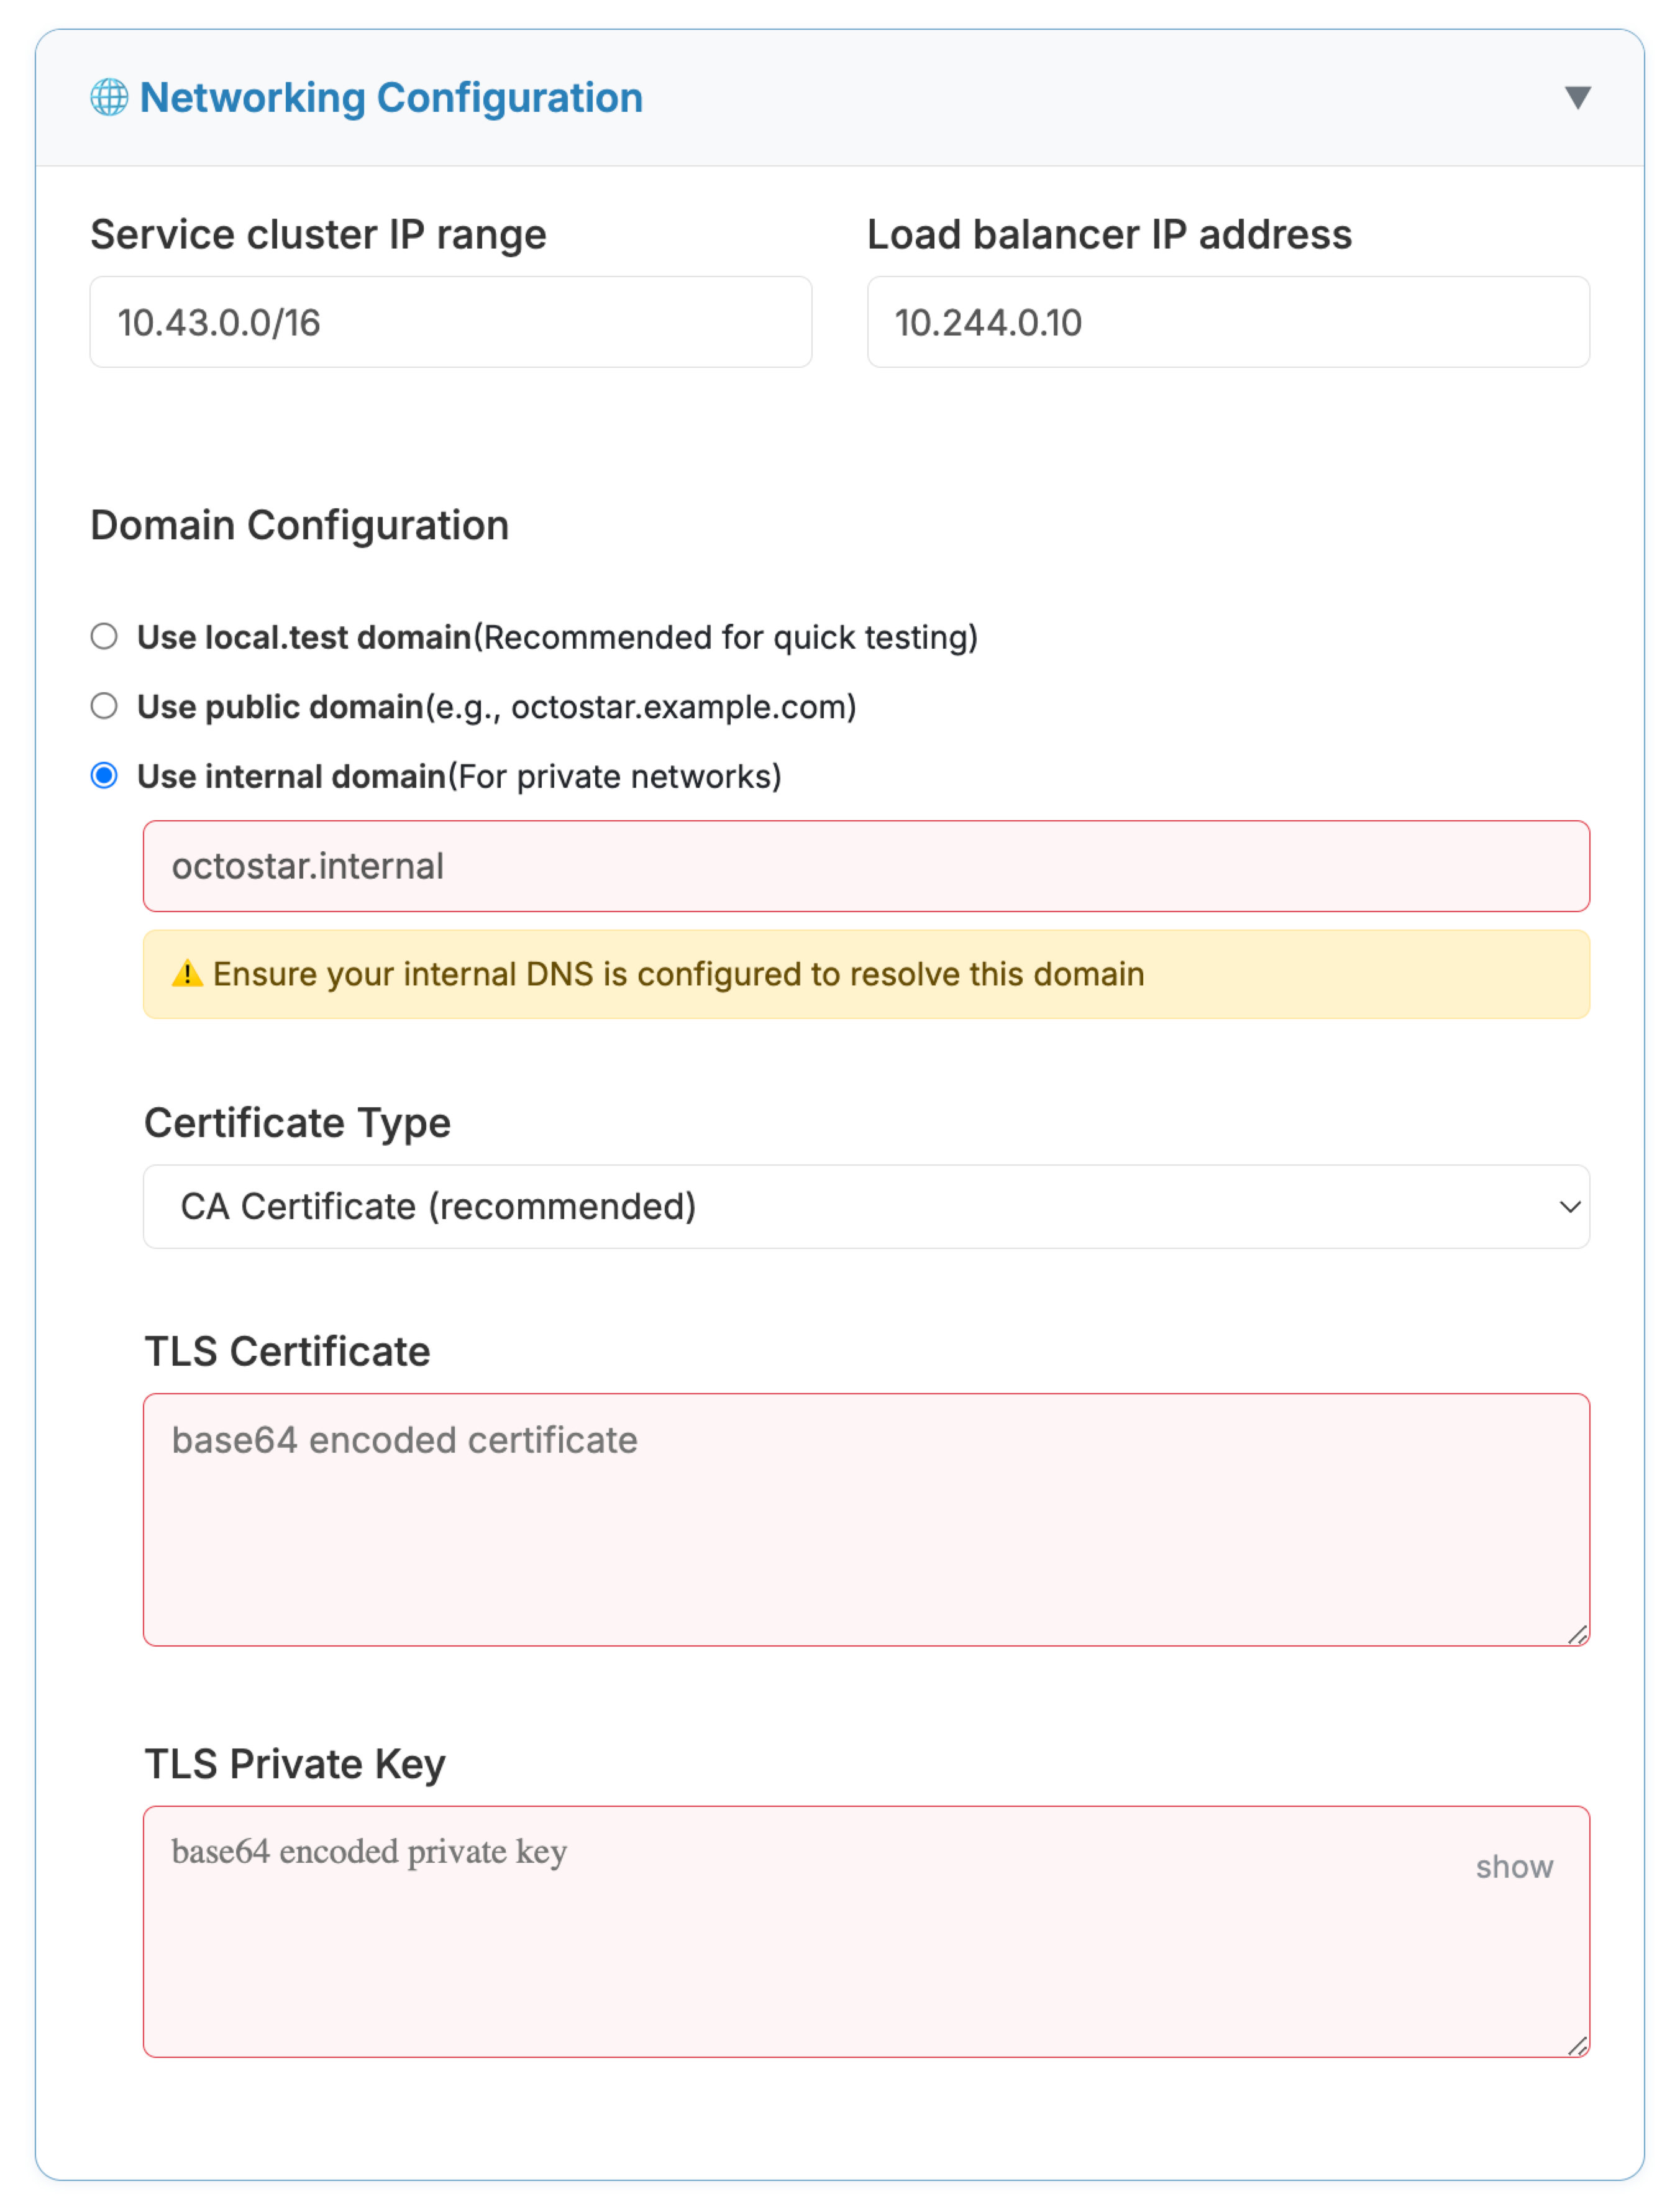 Example: Octostar installation form with CA fields
RKE2 Default Configuration
The default values for "Service cluster IP range" and "Load balancer IP address" in the installation form work well when using RKE2 Kubernetes default configuration. If you're using RKE2, you can typically leave these fields with their suggested values.
- Set your domain: Enter the domain you generated certificates for (e.g.,
octostar.local) - Enable HTTPS: Select "Yes" in the networking configuration
- Paste CA files: Copy the
CA_CERTandCA_KEYvalues from the script output into the form fields - Configure other settings: Complete the remaining form fields as needed
- Copy the command: Click "COPY AUTO-INSTALL COMMAND" to get your one-liner installation command
Step 4: Configure Internal DNS
Configure your internal DNS to point your domain to your server's IP address:
Option A: Internal DNS Server
Add multiple A records to your internal DNS zone for all Octostar services:
| Hostname | Service | Record Type | IP Address |
|---|---|---|---|
| home.octostar.local | Main web application | A | load balancer ip addr |
| fusion.octostar.local | Fusion service | A | load balancer ip addr |
| minio.octostar.local | MinIO console | A | load balancer ip addr |
| minio-api.octostar.local | MinIO API | A | load balancer ip addr |
| wss.octostar.local | WebSocket service | A | load balancer ip addr |
| nifi.octostar.local | Apache NiFi | A | load balancer ip addr |
| kibana.octostar.local | Kibana dashboard | A | load balancer ip addr |
| api.octostar.local | API service | A | load balancer ip addr |
| grafana.octostar.local | Grafana monitoring | A | load balancer ip addr |
| prometheus.octostar.local | Prometheus metrics | A | load balancer ip addr |
TTL: 300 seconds (or per your DNS policy) |Note: All records point to the same IP address
About the Load Balancer IP
The load balancer IP address you configure in the installation form is automatically assigned toMetalLBduring the Octostar deployment process.
MetalLB is a load balancer implementation for bare metal Kubernetes clusters. It provides network load balancing capabilities that aren't natively available in bare metal environments (unlike cloud providers that have built-in load balancers). MetalLB announces this IP address to your network and routes all incoming traffic to the appropriate Kubernetes services based on the hostname.
Ensure your internal DNS zone is properly configured and propagated across your network infrastructure.
Option B: Local Hosts File
On each client machine, edit the hosts file:
load balancer ip addr home.octostar.local fusion.octostar.local minio.octostar.local minio-api.octostar.local wss.octostar.local nifi.octostar.local kibana.octostar.local api.octostar.local grafana.octostar.local prometheus.octostar.localStep 5: Trust the Root Certificate
To avoid browser warnings, install the Root CA certificate on client machines:
# Copy certificate to trusted store
sudo cp ca.crt /usr/local/share/ca-certificates/octostar-ca.crt

# Update certificate store
sudo update-ca-certificates
Step 6: Deploy and Test
- Run the Octostar installer with your configuration
- Wait for the deployment to complete
- Access your Octostar instance at
https://home.octostar.local(or your chosen domain) - Verify the certificate is trusted (padlock icon in browser)
Troubleshooting
Certificate Warnings Still Appear
- Ensure the Root CA is properly installed on the client machine
- Check that the domain in the certificate matches the URL you're accessing exactly
- Clear browser cache and restart the browser
Cannot Access the Site
- Verify DNS resolution:
ping octostar.local - Check firewall rules allow HTTPS (port 443)
- Ensure Kubernetes ingress is properly configured
Certificate Expired
Self-signed certificates expire after 365 days by default. To renew:
- Regenerate certificates using the script
- Update Octostar configuration with new certificates
- Redistribute the new Root CA to client machines
Security Considerations
While self-signed certificates provide encryption, they have limitations:
- No Third-party Validation: Anyone can create a self-signed certificate
- Manual Trust Required: Each client must manually trust your CA
- No Revocation: Unlike CA-signed certificates, there's no revocation mechanism
For internal networks, these limitations are acceptable, but never use self-signed certificates for public-facing services.
Alternative: Internal Certificate Authority
For larger deployments, consider setting up an internal Certificate Authority using tools like:
- Step CA: Modern, open-source CA for internal infrastructure
- Microsoft Active Directory Certificate Services: For Windows environments
- FreeIPA: Integrated CA for Linux environments
These provide centralized certificate management and automatic trust distribution.
Next Steps
Once your SSL is configured:
- Access the Octostar web app securely at
https://home.octostar.local - Explore your default workspaces, and default apps
- Set up monitoring - if installed, at
https://grafana.octostar.local/ - Implement backup strategies
For questions or issues, visit our Installer form